Frontend Quickstart: build your first dApp
Frontend Quickstart: build your first dApp
Info
Although this tutorial can be used as a reference to understand how to create frontends to interact with zkSync contracts, this is a continuation of the Quickstart tutorial. Make sure to complete it before continue.
In this tutorial we're going to:
- Create a basic frontend to interact with the contract deployed in the quickstart tutorial.
- Learn about
zksync-ethersand use it to connect to zkSync and interact with our contract. - Learn about paymasters.
- Integrate a paymaster in our frontend to allow users to pay transaction fees in any ERC20 token.
Prerequisites
- Download and install Node.js.
- Use the
yarnornpmpackage manager. We recommend usingyarn. To installyarn, follow the Yarn installation guide. - Get some ERC20 tokens. The easiest way is to mint TEST tokens directly in our explorer. You can also get Sepolia USDC or DAI from the Aave faucet and then bridge them to zkSync using the zkSync bridge.
Setup the project
We're going use the Vue.js web framework to build this app although the process is similar with other frameworks like React. In addition, we're going to use the zksync-ethers SDK, which extends ethers with zksync-specific features. In order to focus on zksync-ethers, we provide a prebuilt template project with most of the frontend code. We'll just need to implement the methods to interact with the smart contracts. Let's start!
- Clone the template project and
cdinto the folder.
git clone https://github.com/matter-labs/tutorials
cd tutorials/hello-world/frontend
- Spin up the project.
yarn
yarn dev
Navigate to http://localhost:8080/ in a browser to see the application running.
Project Structure
We'll only work in the <script> section of the ./src/App.vue file. Some methods are already provided while other have to be implemented. We'll go through these ones one by one:
// METHODS TO BE IMPLEMENTED
  const initializeProviderAndSigner= async ()=>{
    // TODO: initialize provider and signer based on `window.ethereum`
  }

  const getGreeting = async ()=> {
    // TODO: return the current greeting
    return "";
  }

  const getFee = async() => {
    // TODO: return formatted fee
    return "";
  }

  const getBalance = async()=> {
    // TODO: Return formatted balance
    return "";
  }
  const getOverrides = async() => {
    if (selectedToken.value.l2Address != ETH_ADDRESS) {
      // TODO: Return data for the paymaster
    }

    return {};
  }
...
At the top of the <script> tag, there are also placeholder variables for the address of your deployed Greeter contract, GREETER_CONTRACT_ADDRESS, and the path to its ABI, GREETER_CONTRACT_ABI.
<script setup lang="ts" >
import { ref, onMounted } from 'vue'
// TODO: import ethers and zksync-ethers

const GREETER_CONTRACT_ADDRESS = ""; // TODO: insert the Greeter contract address here
import * as GREETER_CONTRACT_ABI from './abi.json' // TODO: Complete and import the ABI
Install zksync-ethers
- From the
hello-world/frontendroot directory, install thezksync-etherslibrary by running the following command in your terminal:
yarn add ethers zksync-ethers
npm install zksync-ethers
- Add the library imports under at the top of the
./src/App.vuefile.
<script setup lang="ts" >
import { ref, onMounted } from 'vue'

import {} from "zksync-ethers";
import {} from "ethers";
Add the Contract Info
Tips
- To interact with a smart contract deployed to zkSync, we need its ABI.
- ABI stands for Application Binary Interface and it's a JSON which describes the contract's variables and methods.
Locate the
./src/abi.jsonfile. It already contains information but it's better to use the one you created instead; just in case you added new methods.Copy/paste the contract's ABI from the
./artifacts-zk/contracts/Greeter.sol/Greeter.jsonfile in the Hardhat project from the Quickstart tutorial, intoabi.jsonreplacing the existing one. The file should look something like this:
[
  {
    "inputs": [
      {
        "internalType": "string",
        "name": "_greeting",
        "type": "string"
      }
    ],
    "stateMutability": "nonpayable",
    "type": "constructor"
  },
  {
    "inputs": [],
    "name": "greet",
    "outputs": [
      {
        "internalType": "string",
        "name": "",
        "type": "string"
      }
    ],
    "stateMutability": "view",
    "type": "function"
  },
  {
    "inputs": [
      {
        "internalType": "string",
        "name": "_greeting",
        "type": "string"
      }
    ],
    "name": "setGreeting",
    "outputs": [],
    "stateMutability": "nonpayable",
    "type": "function"
  }
]
- The
GREETER_CONTRACT_ABIvariable already imports theabi.jsonfile so there's nothing else you need to do:
import * as GREETER_CONTRACT_ABI from "./abi.json"; // TODO: Complete and import the ABI
Initialise Provider and Signer
The initializeProviderAndSigner function in ./src/App.vue is called right after the connection to Metamask is successful. In this function we should:
- Initialize a
BrowserProviderand aSignerto interact with zkSync. - Initialize the
Contractobject to interact with theGreetercontract we deployed previously.
- Import the necessary classes from
zksync-ethersin the import statement we added previously:
import { Contract, BrowserProvider, Provider } from "zksync-ethers";
- Initialise the provider, signer, and contract instances like this:
const initializeProviderAndSigner = async () => {
  provider = new Provider("https://sepolia.era.zksync.dev");
  // Note that we still need to get the Metamask signer
  signer = await new BrowserProvider(window.ethereum).getSigner();
  contract = new Contract(GREETER_CONTRACT_ADDRESS, GREETER_CONTRACT_ABI, signer);
};
zksync-ethers classes
Note that classes like Contract and Provider have the same constructor parameters in zksync-ethers.
zksync-ethers extends the existing classes from ethers with zksync-specific methods so, unless you're using any of those features, you won't need to do any changes in your code.
Retrieve the Greeting
Fill in the function to retrieve the greeting from the smart contract:
const getGreeting = async () => {
  // Smart contract calls work the same way as in `ethers`
  return await contract.greet();
};
Now if you go back to your browser, after connecting the Metamask wallet to zkSync Era Testnet, you should see the following page:
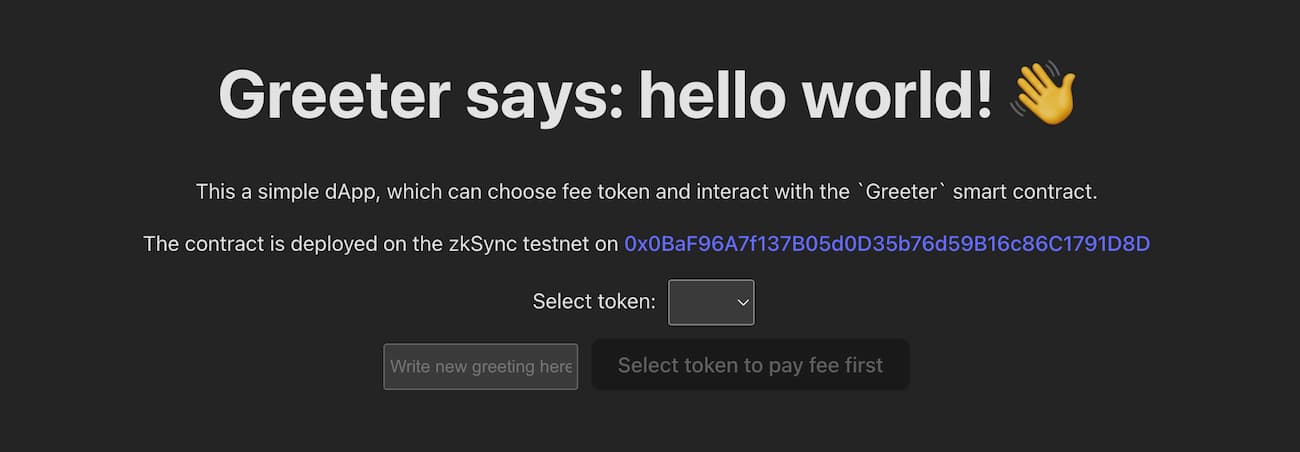
The "select token" dropdown menu allows you to choose which token to pay fees with. We'll enable this feature later.
Check Balance and Estimate Fee
The easiest way to retrieve the user's balance is to use the Signer.getBalance function.
- Add the following dependencies to the same place you added imports before:
// `ethers` is only used in this tutorial for its utility functions
import { ethers } from "ethers";
- Implement the
getBalance()function as shown below:
const getBalance = async () => {
  // Getting the balance for the signer in the selected token
  const balanceInUnits = await signer.getBalance(selectedToken.value.l2Address);
  // To display the number of tokens in the human-readable format, we need to format them,
  // e.g. if balanceInUnits returns 500000000000000000 wei of ETH, we want to display 0.5 ETH the user
  return ethers.formatUnits(balanceInUnits, selectedToken.value.decimals);
};
- Implement the
getFee()method that will estimate how much will it cost to update the message in theGreeter.solcontract calling thesetGreetingmethod:
const getFee = async () => {
  // Getting the amount of gas (gas) needed for one transaction
  const feeInGas = await contract.setGreeting.estimateGas(newGreeting.value);
  // Getting the gas price per one erg. For now, it is the same for all tokens.
  const gasPriceInUnits = await provider.getGasPrice();

  // To display the number of tokens in the human-readable format, we need to format them,
  // e.g. if feeInGas*gasPriceInUnits returns 500000000000000000 wei of ETH, we want to display 0.5 ETH the user
  return ethers.formatUnits(feeInGas * gasPriceInUnits, selectedToken.value.decimals);
};
Now, when you select the token to pay the fee, both the account balance and the expected fee for the transaction will be displayed.
Enter the message you want to save and click Refresh to recalculate the fee. Note that the fee depends on the length of the message that we want to store in the contract.
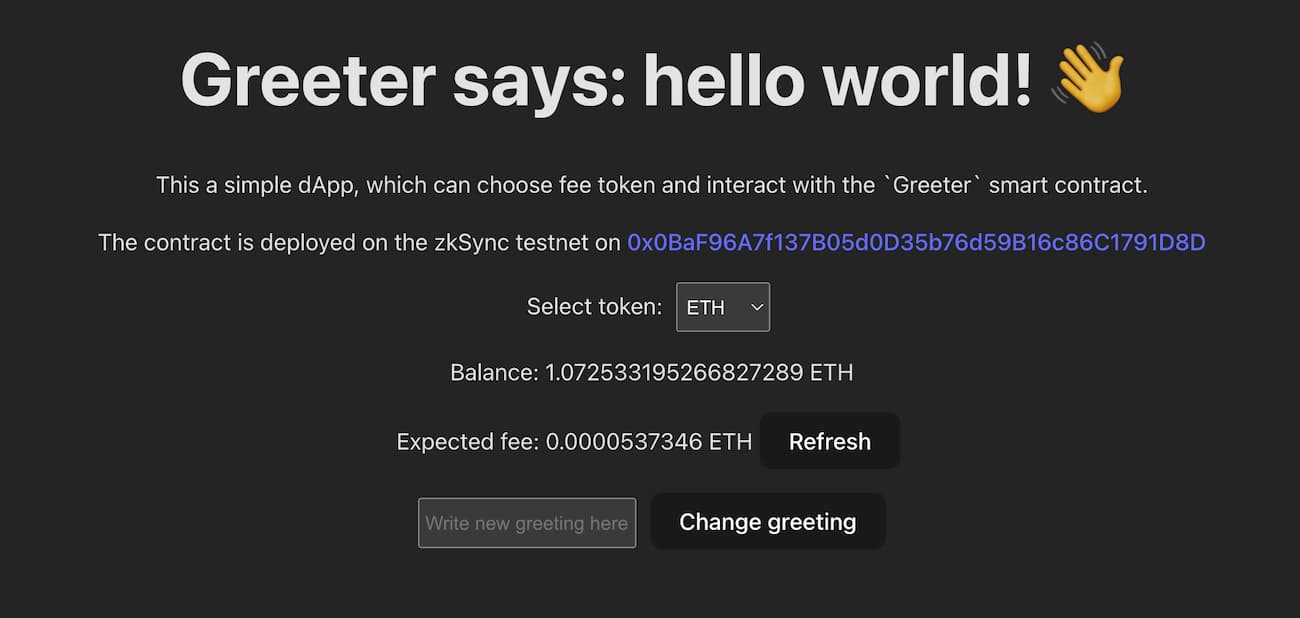
It is possible to also click on the Change greeting button, but nothing will happen yet as we haven't implemented the function. Let's implement that next.
Update the Greeting
Update the changeGreeting function in ./src/App.vue with the following code:
const changeGreeting = async () => {
  txStatus.value = 1;
  try {
    const overrides = await getOverrides();
    const txHandle = await contract.setGreeting(newGreeting.value, overrides);

    txStatus.value = 2;

    // Wait until the transaction is committed
    await txHandle.wait();
    txStatus.value = 3;

    // Update greeting
    greeting.value = await getGreeting();

    retrievingFee.value = true;
    retrievingBalance.value = true;
    // Update balance and fee
    currentBalance.value = await getBalance();
    currentFee.value = await getFee();
  } catch (e) {
    console.error(e);
    alert(e);
  }

  txStatus.value = 0;
  retrievingFee.value = false;
  retrievingBalance.value = false;
  newGreeting.value = "";
};
Now you can update the greeting message in the contract via a transaction sent with Metamask. Once the transaction is processed, you will see the Greeter message change on the app.
Congrats! You now have a fully functional Greeter-dApp! However, it does not yet leverage any zkSync-specific features. Let's fix that by integrating a paymaster!
Note
Do you see a wallet_requestPermissions error?
Refresh your browser, or open the Metamask extension on your browser and click Next or Cancel to resolve it.
Read more about wallet_requestPermissions, in the MetaMask documentation.
Pay Fees with ERC20 Tokens
zkSync Era has native account abstraction, a feature that allows application developers to integrate paymasters. You can find more information about paymasters in this section of our docs but the TL;DR is the following:
- Paymasters are smart contracts that alter the fee mechanism of the protocol.
- The paymaster contract pays the transaction fees with ETH using its own balance.
- Instead of forcing users to just pay transaction fees with ETH, the paymaster contract logic dictates what can be done.
- From a user's point of view, paymasters can allow users to pay gas fess with ERC20 tokens or even allow gasless transactions.
- To integrate a paymaster in your app, transactions must include specific parameters as transaction overrides in a custom property called
paymasterParams
We will use the testnet paymaster that is provided on all zkSync Era testnets.
About the testnet paymaster
The testnet paymaster allows users to pay fees in any ERC20 token with a fixed exchange rate of 1:1 - Token:ETH, i.e. one unit of the token for one wei of ETH.
This means that transaction fees in tokens with fewer decimals than ETH will be bigger; for example, USDC which has only 6 decimals. This is a known behaviour of the testnet paymaster, which was built for demonstration purposes only.
As the name suggests, the testnet paymaster is only available on testnet. When integrating your protocol on mainnet, you should follow the documentation of the paymaster you use, or create your own.
The getOverrides function returns an empty object when users decide to pay with Ether but, when users select the ERC20 option, it should return the paymaster address and all the information required to interact with it. Let's see how it's done.
- To retrieve the address of the testnet paymaster we'll use the
getTestnetPaymasterAddressmethod from the zkSync provider. This is one of the zksync-specific methods provided byzksync-ethers:
const getOverrides = async () => {
  if (selectedToken.value.l2Address != ETH_ADDRESS) {
    // retrieve the testnet paymaster address
    const testnetPaymaster = await provider.getTestnetPaymasterAddress();

    // ..
  }

  return {};
};
- Import
utilsfromzksync-ethersSDK as we'll need to use some of its methods next:
import { Contract, Web3Provider, Provider, utils } from "zksync-ethers";
- We need to calculate how many tokens are required to process the transaction. Since the testnet paymaster exchanges any ERC20 token to ETH at a 1:1 rate, the amount is the same as the ETH amount in wei:
async getOverrides() {
  if (this.selectedToken.l1Address != ETH_L1_ADDRESS) {
    const testnetPaymaster = await this.provider.getTestnetPaymasterAddress();

    const gasPrice = await provider.getGasPrice();

    // define paymaster parameters for gas estimation
    const paramsForFeeEstimation = utils.getPaymasterParams(
      testnetPaymaster,
      {
        type: "ApprovalBased",
        minimalAllowance: BigInt("1"),
        token: selectedToken.value.l2Address,
        innerInput: new Uint8Array(),
      }
    );

    // estimate gasLimit via paymaster
    const gasLimit = await contract.setGreeting.estimateGas(
      newGreeting.value,
      {
        customData: {
          gasPerPubdata: utils.DEFAULT_GAS_PER_PUBDATA_LIMIT,
          paymasterParams: paramsForFeeEstimation,
        },
      }
    );
    // fee calculated in ETH will be the same in
    // ERC20 token using the testnet paymaster
    const fee = gasPrice.mul(gasLimit);

    // ..
  }

  return {};
}
- Now, what is left is to encode the paymasterInput following the protocol requirements and return the needed overrides.
This will be the complete function:
const getOverrides = async () => {
  if (selectedToken.value.l2Address != ETH_ADDRESS) {
    const testnetPaymaster = await provider.getTestnetPaymasterAddress();

    const gasPrice = await provider.getGasPrice();

    // define paymaster parameters for gas estimation
    const paramsForFeeEstimation = utils.getPaymasterParams(testnetPaymaster, {
      type: "ApprovalBased",
      minimalAllowance: BigInt("1"),
      token: selectedToken.value.l2Address,
      innerInput: new Uint8Array(),
    });

    // estimate gasLimit via paymaster
    const gasLimit = await contract.setGreeting.estimateGas(newGreeting.value, {
      customData: {
        gasPerPubdata: utils.DEFAULT_GAS_PER_PUBDATA_LIMIT,
        paymasterParams: paramsForFeeEstimation,
      },
    });

    // fee calculated in ETH will be the same in
    // ERC20 token using the testnet paymaster
    const fee = gasPrice * gasLimit;

    const paymasterParams = utils.getPaymasterParams(testnetPaymaster, {
      type: "ApprovalBased",
      token: selectedToken.value.l2Address,
      // provide estimated fee as allowance
      minimalAllowance: fee,
      // empty bytes as testnet paymaster does not use innerInput
      innerInput: new Uint8Array(),
    });

    return {
      maxFeePerGas: gasPrice,
      maxPriorityFeePerGas: BigInt(1),
      gasLimit,
      customData: {
        gasPerPubdata: utils.DEFAULT_GAS_PER_PUBDATA_LIMIT,
        paymasterParams,
      },
    };
  }

  return {};
};
The ApprovalBased type in the paymasterParams indicates that this paymaster allows ERC20 tokens. Behind the scenes, zkSync will take care of approve the ERC20 spending.
- To enable the use a list of ERC20 tokens, change the following line:
import allowedTokens from "./eth.json"; // change to "./erc20.json" to use ERC20 tokens
to the following, which uses a list of predefined ERC20 tokens including DAI, USDC and the TEST token:
import allowedTokens from "./erc20.json"; // change to "./erc20.json" to use ERC20 tokens
Complete Application
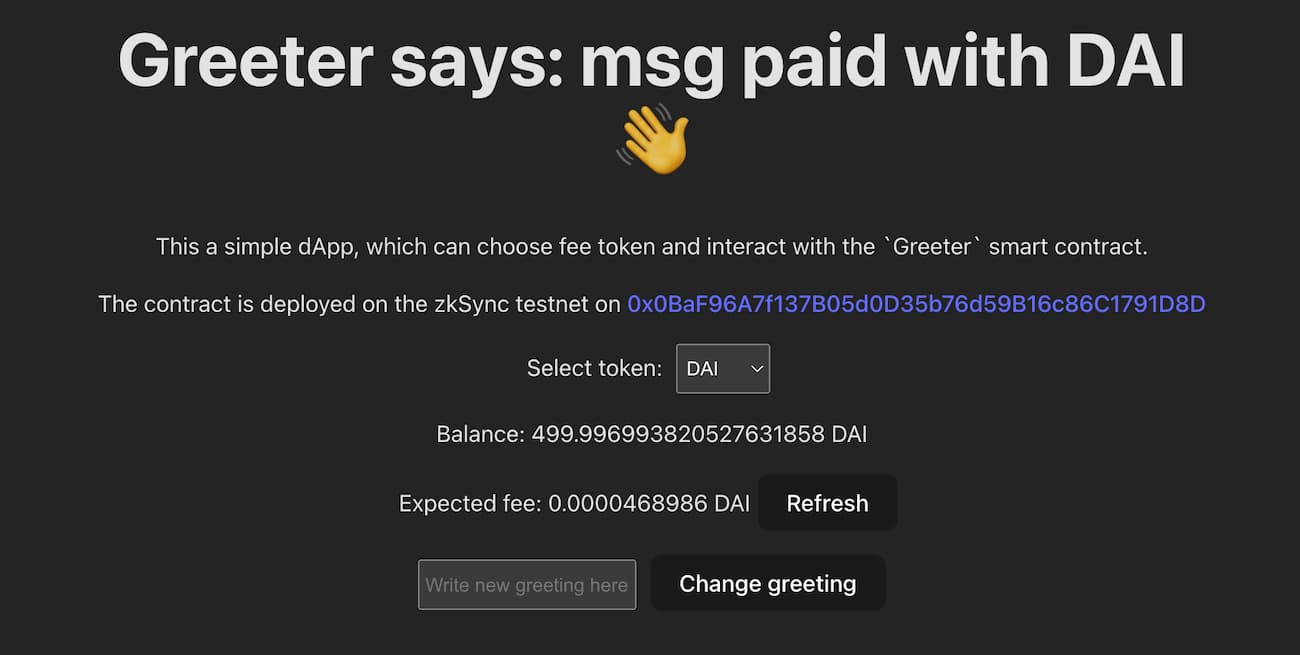
Now you should be able to update the greeting message with ETH or any of the available tokens.
- Select one of the ERC20 tokens to see the estimated fee:
- Click on the
Change greetingbutton to update the message. Since thepaymasterParamswere supplied, the transaction will be anEIP712(more on EIP712 here) so it'll look slightly different in your wallet:
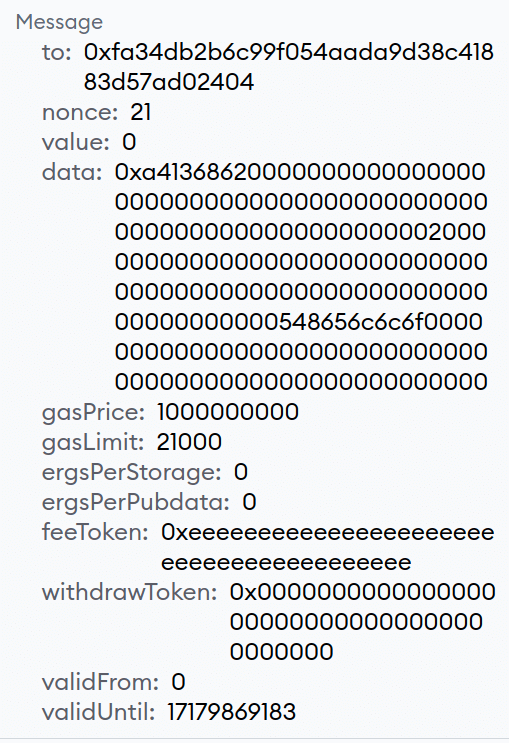
- Click "Sign" to send the transaction.
After the transaction is processed, the page updates the balances and the new greeting can be viewed.
You've paid for this transaction with an ERC20 token using the testnet paymaster 🎉
Takeaways
zksync-ethersis a Javascript library that extendsetherswith zksync-specific methods.- Paymasters allow users to pay transaction fees in ERC20 tokens or gasless.
- Paymasters can be easily integrated in frontend applications by including additional transaction parameters.
Next steps
- For an overview of security and best practices for developing on zkSync Era, refer to the Security and best practices page.
- To learn more about
zksync-ethersSDK, check out its documentation. - To learn more about the zkSync hardhat plugins, check out their documentation.
- If you have a project, check out our migration guide.